Note: This website is new and is a major work in progress. Over the coming weeks and months I will be adding introduction videos, a mini on-ramp program for people who are new to dryfiring, and more. If you have any suggestions, questions, or feedback please email me at defender.dryfire@gmail.com.
Disclaimer
Handling firearms is an inherently dangerous act. Great care must be taken to ensure that potentially fatal mistakes do not occur. Prior to starting any dryfire training, double and triple check that your firearms are unloaded, all magazines contain only dummy rounds, and that no live ammo is present in your training area. Place all dryfire targets on a wall with a safe backstop. Lastly, observe the 5 Universal Firearms Safety Rules:
1) Treat every weapon as if it is loaded.
2) Never point your weapon at anything that you do not intend to destroy.
3) Keep your weapon on safe until you intend to fire.
4) Keep you finger off the trigger until you intend to fire.
5) Know your target and what lies beyond it.
What is the Dryfire for Defenders program?
As armed citizens and professionals who carry a gun on a daily basis, we have a responsibility to ourselves, our family, our community, and our country to be highly proficient with our equipment. Proficiency comes from training. Many people believe that the only way to get good at shooting is by firing live ammunition. While that is a necessary component of a quality training program, it only composes 5-10%. The rest of your training can and SHOULD be done through dryfire. Draws, reloads, target transitions, movement, etc.. can all be trained for free at home in just a few minutes every day.
This website offers two daily training sessions: a 15-minute “Defender” session for armed citizens and an additional 30-minute “Competitor” session for advanced or competition shooters. The Defender Session is intended to develop above average levels of gunhandling, marksmanship, and weapon familiarization. After a few months of consistently following the program, all healthy human beings can achieve the posted drill goal par times, which translate to roughly the equivalent level of shooting skill as a USPSA B-class shooter. The Competitor Session is an add-on program intended to work in tandem with the Defender Program. Ideally, the training sessions should be broken up into 2-3 sessions per day to maximize your ability to focus while training. Personally, I like to do the Defender Session with my concealed carry gear or duty belt in the morning prior to leaving the house and then do the Competitor Session with my USPSA competition belt in the evening.
If you aren’t sure how to do a certain drill, head over to the Video Page.
This looks complicated.
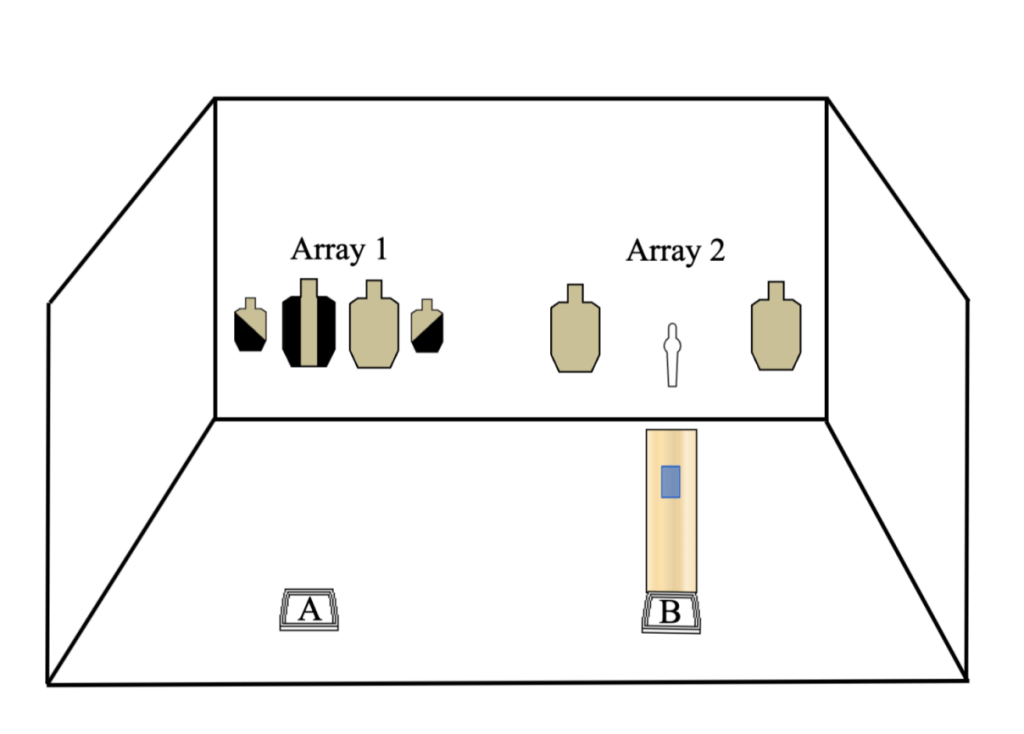
It may look daunting at first, but after the first few days you’ll get into a good groove and the sessions will flow smoothly. Every isolation drill has demo video on the Video Page linked above. The Practice Stages are conducted like a mini-USPSA stage where you shoot the targets in one consecutive string of fire.
How much space do I need?
You can develop world class gunhanding and marksmanship in just a 3’ x 3’ box. However, a roughly 15’ x 15’ area is preferred, and more is better. No excuses, use whatever you have: a spare bedroom, office, section of the garage, etc…
What Gear do I need?
At a minimum you’ll need:
- Pistol
- Holster
- 2 Spare Handgun Magazines
- Handgun Magazine Pouch or Neomag
- You can also do your pistol reloads from your pocket if that’s normally how you carry
- 4+ Pistol Dummy Rounds
- Ideally, you’ll eventually have enough that you can fill up both magazines to capacity
- A Shot Timer
- I personally like the Pro Timer for dryfire due to its simplicity; I have had issues with their long term durability when using them outside in the elements 2-3 days per week, but it will last for years with daily dryfire use and occasional range trips
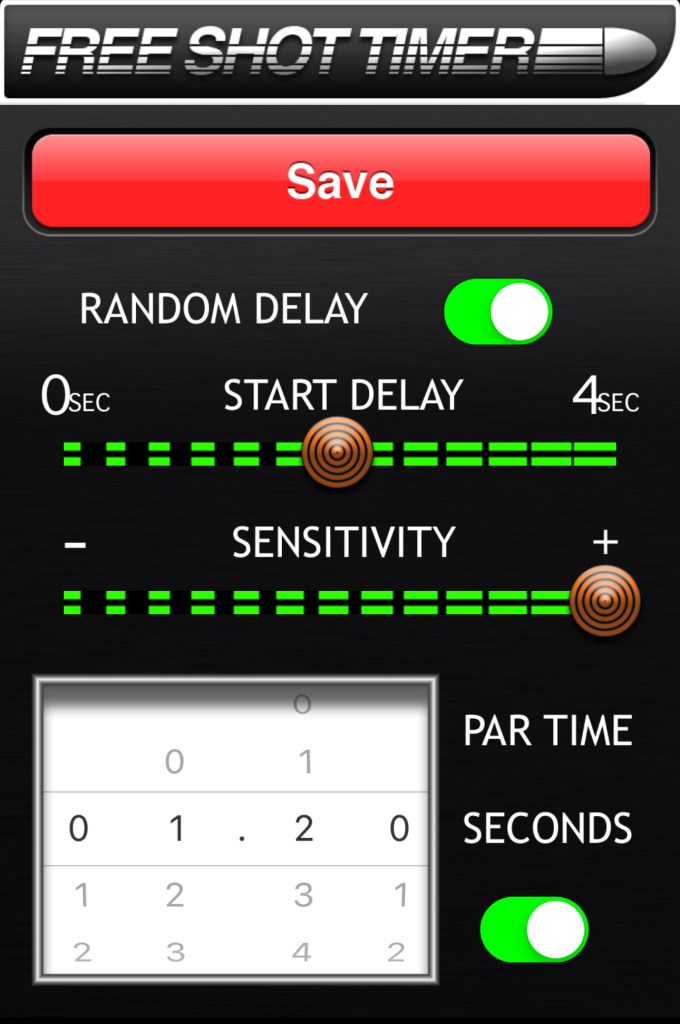
- You can also use a free phone app such as “Shot Timer”
- Rifle
- Sling
- 2 Spare Rifle Magazines
- Rifle Magazine Pouch or Chest Rig
- You can also do the Rifle Reloads from your back pocket if you don’t have a mag pouch or chest rig
- 4+ Rifle Dummy Rounds
- Ideally, you’ll eventually have enough that you can fill up both magazines to capacity
Targets
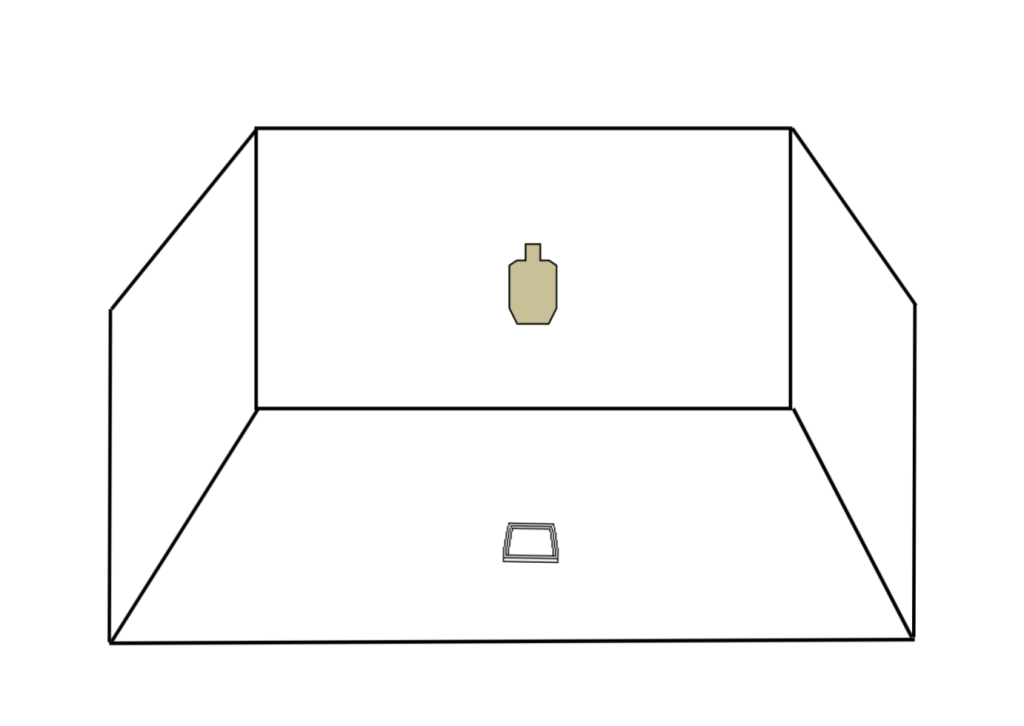
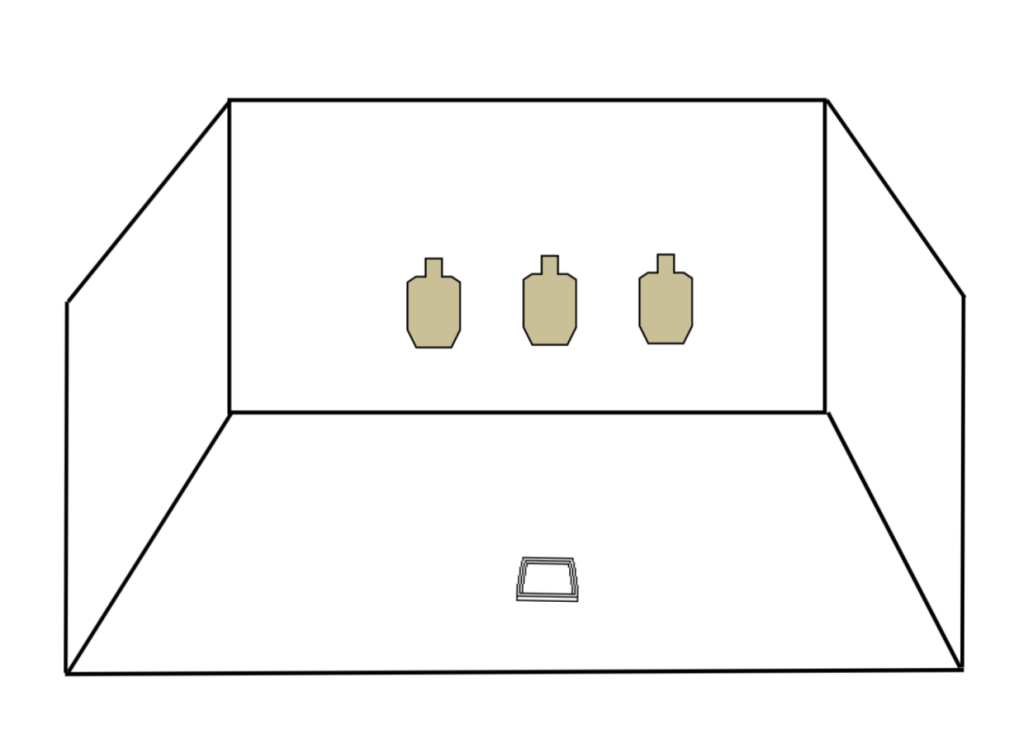
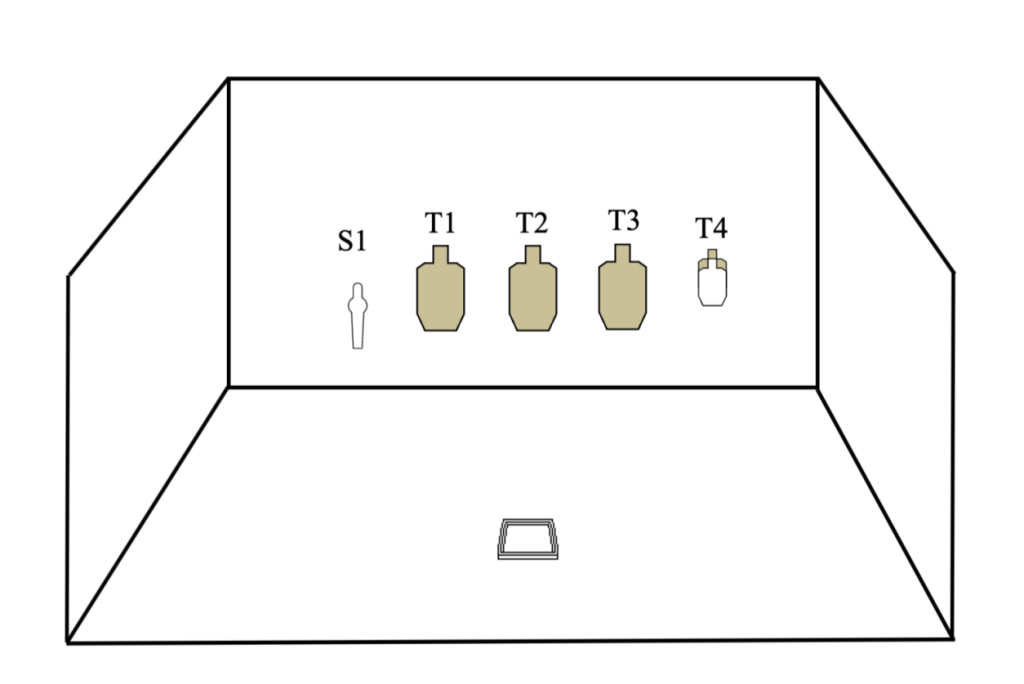
Unless otherwise noted on a particular drill, the standard distance for the drills during the daily training sessions is 10 yards. This can be simulated by using 1/3 scale targets 10 feet away. On the drill diagrams, you’ll often see smaller targets as well, these are 1/6 scale and simulate 20 yards when they are 10 feet away.
You can buy scaled dryfire targets from the Ben Stoeger Pro Shop. Alternatively, you can use index cards or print out paper USPSA style targets from Baer Solutions. You’ll want at least:
- 3 standard USPSA targets (1/3 scale)
- 3 standard USPSA targets (1/6 scale)
- 2 White No-shoot targets (1/3 scale)
- 2 White No-shoot targets (1/6 scale)
- 1 of each “partial” hardcover target (1/3 scale)
- 1 of each “partial” hardcover target (1/6 scale)
- 3 Steel Poppers (1/3 scale)
- 3 Steel Poppers (1/6 scale)
- 1 Barricade
- Free-standing target stand
- (2) 1” x 2” sticks (5ft long)
- Cardboard section
What’s a par time?
A par time is how long it takes you to complete a certain drill. You’ll use the “Par” function on your shot timer to give you a start and end beep in which your goal is to complete the drill. You’ll also want to set the timer for a “Random Delay” Start which varies the amount of time between pushing the Start button and the buzzer.
For example, if you are working on your draws and you’re using the free “Shot Timer” phone app, you would set a goal par time (let’s say 1.2 seconds) and when you’re ready to do a practice draw, press the Start button and wait while visually picking out a small aiming point on the target. As soon as you hear the buzzer, draw the pistol and attempt to complete the rep before the end buzzer tone sounds.

Many of the drills on this site have a Goal Par Time. The goal times for the Defender Sessions are roughly equivalent to USPSA B-class performance and the goal times for the Competitor Sessions are roughly equivalent to USPSA Master or Grandmaster performance. When you’re doing a drill for the first time, set a conservative par time and do 1-2 reps. Continue decreasing the par time every rep or two until you find the level where you’re no longer able to consistently complete the drill prior to the ending buzzer, this is a your Improvement Zone.
When you’re doing practice stages or drills with multiple targets, it is VERY important that you are honest with yourself regarding your sight pictures on each target. You can REALLY screw up your livefire shooting if you’re not visually disciplined during dryfire. It is very easy to achieve artificially fast dryfire times by not establishing an acceptable sight picture on each target or mashing the trigger as quickly as possible as your gun streaks past the target.
OK, I’m interested. Where do I start?
Once you have the minimum required equipment, go to the Defender Session and read through it. Prior to starting the training session, go to the Videos Page and search for each drill listed during the session and watch the short videos for how the drills should be conducted. Once you have a basic understanding of the drills, go to your training area, visually and physically verify that your weapon is clear and that no live ammunition is present. Put on your holster, load a DUMMY ROUND into the chamber, and get started with the drills. If you have no idea what your Par Time will be for a given drill, try adding a full second to the listed par time and go from there. If that’s not enough time, that’s okay, simply add a bit more time. You’ll be blown away how much faster you’ll get after just a few days of consistent training.
When you get to the rifle portion of the session, visually and physically verify again that no live ammunition is inside the weapon, load a DUMMY ROUND into the chamber and do the rifle drills.
If you’re an experienced shooter or if you want to improve even more quickly, try doing the Competition Session later in the day. The Goal Par Times are significantly faster, but don’t let that intimidate you. The only person you’re competing against is the shooter you were yesterday. Do the drills with par times appropriate for your current level of skill and push yourself to go faster.
A note about dryfire “injuries.”
When you start to do daily dryfire sessions, you will probably notice a few “hotspots” on your hands from gripping the gun. The most common spot is on the inside of your middle finger knuckle on your strong hand from repeatedly running it into the bottom of the trigger guard during draws and reloads. If you start to notice these spots, use a half-width strip of athletic tape to lightly wrap the affected area for a few days until the hotspot goes away. After a few weeks of consistent training, you shouldn’t have any issues with hotspots/blisters unless you add additional training time or frequency into your routine.
Some people may start to develop “tennis elbow” if they introduce too much dryfire training at one time. If you’re prone to these types of overuse injuries, start slowly by reducing the repetitions for each exercise by half for the first week or two of training. Also, if you begin to notice a problem, take steps early to heal up so that you aren’t forced to stop training completely down the road.
Acknowledgements
Many of the concepts, drills, and goal times found in this program are borrowed, with permission, from multi-time National and World Champion shooter, Ben Stoeger. To say that Ben’s training philosophy and methods have been highly influential on my journey to be a better shooter and instructor would be a vast understatement. Dryfire for Defenders is just the tip of the iceberg when it comes to firearms training; if you want to take your shooting farther than you ever thought possible, consider buying Ben’s books, taking a class with Ben, or joining his online coaching platform Practical Shooting Training Group.